Hi, Brian here. Yeah I am still around. That was a big mistake passing the blog over to Ray & Dave. In fact it appears that they are trying to sell me now. I see their point they are setting up a managed hosting business and need loads of cash.
Virtual server? What's that all about? S'pose you go to see it in a virtual car!
Anyway, how can they sell me without my permission? That's slavery isn't it?
Look how could you sell your wife or whatever, or even any 'person'.
Now I know you clever humans think a person is something with two legs and a brain (minimum).
Have a look at the Wiki page on person:
the category of "person" may be taken to include such non-human entities as animals, artificial intelligences, or extraterrestrial life, as well as legal entities such as corporations, sovereign states and other polities, or estates in probate.[4]
Yeah, go on read it again. "non-human", "legal entities"
I'm both of those and I have a log book to prove it. So when you come around with your fistful of readies think about that one. I am certain a good lawyer would prove my case.
ALSO:
I notice someone has been snooping around the blog (MY blog) from Iceland.
NO, NO, NO I am NOT going to live in Iceland at any price.
Look forward to seeing anyone, but don't poke about too hard.
Thanks
Saturday 31 January 2015
Saturday 17 May 2014
Oil Pump
The oil pump on an automatic beetle is different from the manual version.
The automatic oil pump is, in fact, two pumps: one for the oil and one for the ATF.
The pump is held by four studs and nuts. When the nuts are removed the whole pump body slides off.


Next step is to separate the divider plate from the body. It is very tightly fixed although only by two small metal dowels.
I have seen suggested using a screwdriver at the corners to prise it loose. Maybe that is the only way but doesn't seem quite right.
I would have thought punching out the dowels might be the answer but still trying to find out.
The inner body remains inside the case and I think the case must be split before it can be removed. Although if the two case bolts near it are loosened I think it can be eased out using some sort of puller.

The gear in the next picture is held in the body by a woodruff key so that will be revealed when I get the divider plate off.

Squirted some Plus-Gas in strategic places then tapped with a screwdriver, as suggested by Lee on http://vwar.org, (I think) on the two corners by the dowels. A couple of sharp taps and the divider plate moved fairly easily and with a bit of wiggling came apart.


If, like me, you are doing this for the first time I believe it is important to keep all the gears in the same places. Also look out for the tiny woodruff key in the long-shafted gear wheel. It is a tiny (5mm?) half moon-shaped piece of metal that sits in a groove on the shaft and which prevents the shaft coming out. Be careful it doesn't fall out and get lost!
I have seen suggested using a screwdriver at the corners to prise it loose. Maybe that is the only way but doesn't seem quite right.
I would have thought punching out the dowels might be the answer but still trying to find out.
The inner body remains inside the case and I think the case must be split before it can be removed. Although if the two case bolts near it are loosened I think it can be eased out using some sort of puller.
The gear in the next picture is held in the body by a woodruff key so that will be revealed when I get the divider plate off.
Squirted some Plus-Gas in strategic places then tapped with a screwdriver, as suggested by Lee on http://vwar.org, (I think) on the two corners by the dowels. A couple of sharp taps and the divider plate moved fairly easily and with a bit of wiggling came apart.
If, like me, you are doing this for the first time I believe it is important to keep all the gears in the same places. Also look out for the tiny woodruff key in the long-shafted gear wheel. It is a tiny (5mm?) half moon-shaped piece of metal that sits in a groove on the shaft and which prevents the shaft coming out. Be careful it doesn't fall out and get lost!
Saturday 4 January 2014
Removing pulley
The pulley is keyed to the rear end of the crankshaft and retained by a large central bolt. The bolt is torqued to 33 ft/lbs but undoes reasonably easily if you use a large screwdriver or similar tool through the holes in the pulley and jam it against one of the crankcase flanges.
The pulley was a tight fit and the Haynes manual suggests soaking the boss with penetrating oil and hooking something through the two holes if any leverage is necessary. We used a large screwdriver behind the pulley to tease some movement out of it, having first heated the pulley gently with an electric hot air gun. Once it had begun to move we gently tapped evenly all round with a block of wood and hammer.
Haynes recommends not using too much force on the outer edge of the pulley as it may be distorted.
After the pulley has been removed the lower engine plate can be unbolted.
The two retaining bolts can only be accessed after removal of the pulley so on reassembly the plate must be fitted before the pulley.


Monday 18 November 2013
Removing pistons
The pistons are attached to the con(necting) rods by gudgeon pins. The gudgeon pins are held in by two circlips, one either end. The gudgeon pins are a very tight fit and the Haynes manual recommends heating the pistons slightly with an electric light bulb before knocking the pins out.
We hadn't read this and bashed them out with a suitable size socket tube and hammer. Hopefully no damage done, but must read the books first!


We hadn't read this and bashed them out with a suitable size socket tube and hammer. Hopefully no damage done, but must read the books first!


Saturday 26 October 2013
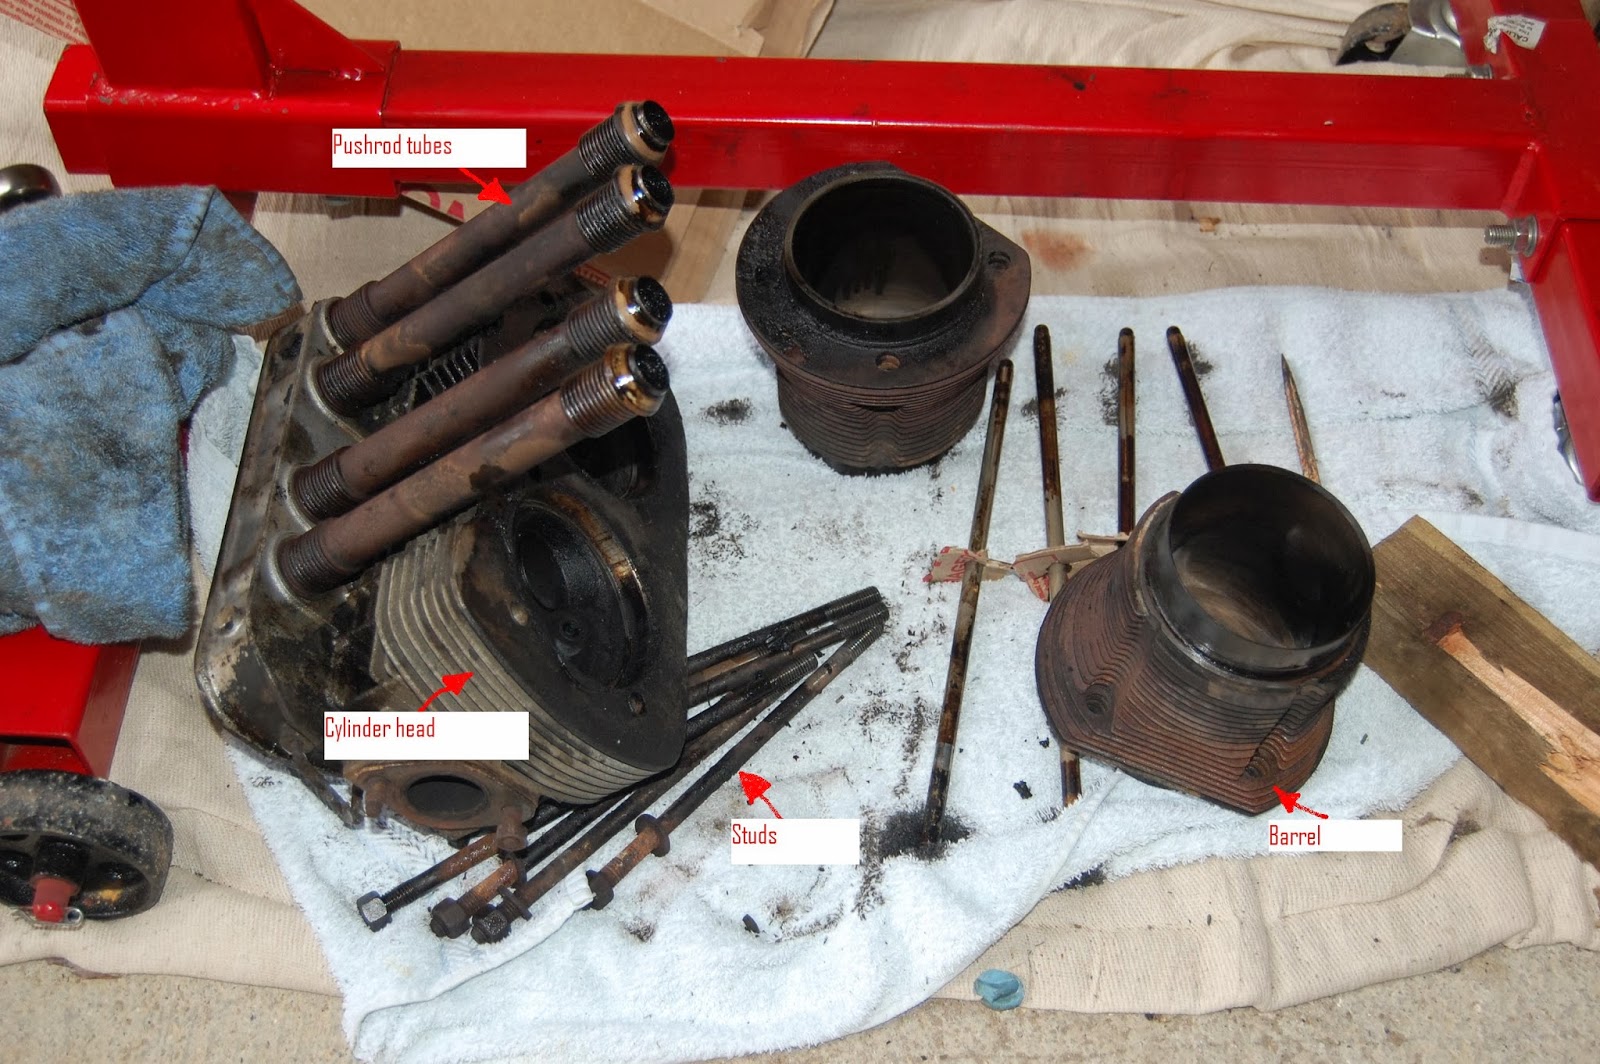
Removal of cylinder heads
The cylinder heads, and the barrels, are held on by long studs from the block. There are eight nuts holding them.They should be loosened and undone in the same sequence as for tightening. Some of the studs will undo from the block and others will not. After removing all of the nuts we removed all the studs by using the 'double nut trick'.
I think the stud removal helps when removing the barrels.
The heads come off first and then remove the barrels. There is a plate under the barrels that clips off. The two barrels on each side are separate units.
The stud bolts hold the heads and the barrels and the pushrod tubes are clamped between the heads and the crankcase. Some tubes come away with the heads and and some stay in the crankcase.
The guide warns against turning the engine at this stage to prevent any damage.
The barrels were quite tight and the guide says tap lightly with a soft faced hammer. We used a block of wood and a hammer but did, unfortunately, damage one of the fins.
I don't think this is a disaster but should be avoided if possible.


Removal of rockers cover and rocker gear
The rocker covers are held on by a large spring clip. The clip is moved away and the covers come off easily.
There are two nuts holding the rocker gear. They are undone and the rocker gear slides off.
 When the rocker gear is off the pushrods can be removed. It is suggested that these are numbered to be are assembled in their correct relative positions.

There are two nuts holding the rocker gear. They are undone and the rocker gear slides off.


Removal of fuel pump and distributor
Two nuts hold the petrol pump. This is easily removed but there is a warning in the Guide I am using not to try and remove the bakelite stand or operating rod as they are fragile and may break. They suggest leaving them in until the engine is split.
There is one nut holding the distributor, in fact it holds the clamp to the block. We undid this and the clamp bolt but the distributor would not even turn let alone come out. Some sharp knocks with a piece of wood and hammer gradually prised the body upwards and out.

There is one nut holding the distributor, in fact it holds the clamp to the block. We undid this and the clamp bolt but the distributor would not even turn let alone come out. Some sharp knocks with a piece of wood and hammer gradually prised the body upwards and out.

Cleaning engine
The engine was taken to a car wash/engine clean facility in Gravesend. Not sure if this is really for engines in-situ but quite effective. The engine was liberally painted with Gunk engine cleaner and left to stand whilst we had coffee. Anyway it worked quite well getting rid of most of the crud that had accumulated over many years.
We had also taken this opportunity to drain the engine oil and dispose of same at the local council dump.

We had also taken this opportunity to drain the engine oil and dispose of same at the local council dump.

Friday 21 June 2013
21st June 2013
The Heat Exchanger had been removed with the bottom plate attached so the plate was removed. It is held to the H/E by two cheesehead screws which appeared impossible to remove with a screwdriver. A good grip with a pair of Mole grips undid them easily. These two screws had their ends cut (vee'd) which is presumably to 'lock' them (anti-vibration?)

The Heat Exchanger had been removed with the bottom plate attached so the plate was removed. It is held to the H/E by two cheesehead screws which appeared impossible to remove with a screwdriver. A good grip with a pair of Mole grips undid them easily. These two screws had their ends cut (vee'd) which is presumably to 'lock' them (anti-vibration?)

Thursday 20 June 2013
Heat Exchanger
The Heat Exchanger was cleaned up with Gunk but in one place has seriously rusted leaving a hole. Plenty of time to think what to do about this. New ones are quite expensive and, I suspect, nowhere near the quality of these originals.

Wednesday 19 June 2013
Removing Heat Exchanger
19th June 2013
We had a big problem with one of the nuts holding the J-Tube. The lower nut & stud nestles between the J-Tube and the heat exchanger so not much room to swing a spanner. Added to that the nut was very corroded and although the size should be 13mm it was smaller and more like 1/2".
Various suggestions from Volkszone and we contemplated buying a set of cheap spanners from Halfords which included a 1/2" (AF?).
We thought if the ring spanner is not a good fit then it would be a waste of £13 or so.
In the end we opted for a nut splitter.
The nut splitter was a bit fiddly and could only fit on to about 2/3rds of the nut which it duly split.
The remainder was butchered off with a sharp chisel. Not ideal but it worked.
There were two cheesehead screws under the crankcase holding a piece of tinware to the heat exchanger and two more at the back of the engine holding the same plate.
Two of the bolts are plain and the other two have their ends v-eed.
Didn't notice which were which but the v-eed ones presumably hold two plates together while the plain ones bolt into the casing (?)


Inlet Manifold
15th June 2013
The carburettor had already been removed and the manifold came off easily. There are two bolts on each tube to be undone and the manifold just lifts off.

The carburettor had already been removed and the manifold came off easily. There are two bolts on each tube to be undone and the manifold just lifts off.

Friday 14 June 2013
13th June 2013 Removed exhaust pipe/silencer
After much hammering at the exhaust pipe with no effect we realised the manifold had to be unbolted! The nuts came off relative easily although one stud had been sheared off previously. The clamps holding the silencer to the manifold were losened and with a bit of tugging and wiggling it came off relatively easily.

Friday 7 June 2013
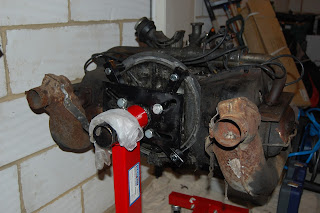
Engine on Sealey stand
The mounting plate from the engine stand was bolted to the engine. The main bolts holding the arms of the mounting plate were left loose and the mounting tubes lined up with the engine case holes and the bolts screwed in loosely. The mounting tubes were lined up to fit outside the flange on the engine casing. When everything was in alignement all the bolts were tightened up.
The top two holes in the engine are not threaded so any length M10 bolts will do. The lower two bolts, however, are threaded. The first bolts used were 100mm M10 but when bolting into the engine we must have passed the threading in the case, which chewed the ends of the bolt thread and were difficult to extract. It was tight all the way out and we were worried that the engine threads would be damaged.
Bought more bolts from Namrick www.namrick.co.uk and found the 90mm M10 were just the right length.
Picture 6: Stand fixing plate.
Picture 7: Mounting 'tubes' & flange

Picture 8: Is it safe?

Hmm. Is it safe. Hope so!
The top two holes in the engine are not threaded so any length M10 bolts will do. The lower two bolts, however, are threaded. The first bolts used were 100mm M10 but when bolting into the engine we must have passed the threading in the case, which chewed the ends of the bolt thread and were difficult to extract. It was tight all the way out and we were worried that the engine threads would be damaged.
Bought more bolts from Namrick www.namrick.co.uk and found the 90mm M10 were just the right length.
Picture 6: Stand fixing plate.

Picture 7: Mounting 'tubes' & flange

Picture 8: Is it safe?

Hmm. Is it safe. Hope so!
Monday 3 June 2013
Getting engine onto stand.
Picture 5. Flexplate removed.

The next task is to get the engine onto a stand to make disassembly easier. A Seeley stand had been purchased. The four 'arms' need to be attached to the engine-to-bell housing holes (see Pic.5).
Two are threaded and two are plain. Four 10mm bolts have been purchased which will hopefully do the trick.
Removal of Flexplate
The Beetle automatic has no flywheel but, instead, a Flexplate, that connects the engine to the torque converter. The flexplate is connected to the engine (crankshaft) with a gland nut tightened to 282 lbs/ft.
The flexplate is attached to the torque converter with four bolts that are accessed one at a time by rotating the engine until they are visible through an access hole.
The four bolts are, I think, undone with a 10mm socket and the gland nut with a 26mm socket. (to be checked).
Picture 1. Bolt, flexplate to torque converter.

Picture 2. Flexplate on engine with gland nut removed.
 Picture 3. Flexplate showing captive nuts for bolts to Torque Converter
 Picture 4. Flexplate with 8mm bolts to remove from engine.

The flexplate is attached to the torque converter with four bolts that are accessed one at a time by rotating the engine until they are visible through an access hole.
The four bolts are, I think, undone with a 10mm socket and the gland nut with a 26mm socket. (to be checked).
Picture 1. Bolt, flexplate to torque converter.

Picture 2. Flexplate on engine with gland nut removed.


Removing the flexplate gland nut appeared to be a difficult job. There were several methods suggested but warnings to take care over the flexiplate as damage would render it useless and difficult to replace. In the end a cheap 1/2" Air 'rattler' gun and a pair of feet stopping the pulley end from turning did the trick. The gland nut came off very easily. To remove the plate two 8mm bolts are screwed into the two threaded holes and gradually tightened to force the plate outwards and off.
Type 1 Beetle engine strip
Let the fun begin! The boys are about to embark on a mission of which they have no prior knowledge. Or, presumably, of which they have no fear.
No doubt that will quickly change, as anyone with experience of old engines (and rust) will know. Although, I am a Beetle:
Vorsprung durch Technik
Hopefully the boys will be able to complete the task and I will have my innards replaced, once more to hit the road.
No doubt notes will be taken and progress photographed in minute detail.
Ok, so I will bow out now and let the story tell itself.
Sunday 6 May 2012
Painless extraction!
There I was, minding my own business in my new(ish) house, ok so there's a bit of a leak in the roof but I am thick-skinned, when the boys suddenly turned up. As well as the boys, I spied a new guy I haven't seen before. The boys kept addressing him as Phil so I assumed they new him.
Anyway, gound sheet is spread out under my arsk no questions get no lies toolboxes are got to the ready and Phil starts fiddling with my derriere. Of course I have utter trust in the boys (why? you ask), they haven't done any serious harm to me yet and, of course, they think I am a valuable asset.
As I say a bit of fiddling and bolts being shown around and marvelled at their as new condition, then a big beast of a Jack appears; no not another new guy, a (an?) hydraulic jack was thrust under my nether regions and... more pulling, shoving and general strenuous activity.
And then the deed was done...an extraction!
No, not a tooth, you silly humans, my engine!
I had a quick peep behind and there it was, in all its glory, sitting on my house floor, looking like some sort of wierd contraption. Is that what pushes me along from behind?
Let's hope the boys can get that thing sorted out and put back in where it belongs.
I heard Phil say he would be pleased to get it returned to its proper place and the boys jokingly retorted that they would see him in a couple of years time then!!!
Sounds about right!
Thursday 29 December 2011
Christ!!!!!!!!!!!!!!!!!!mas
Sorry about the title, but if you were me you would feel the same.
D'you know what? I been shut up in my 'new home', all on my own with no visitors since, hm, I don't know..September?? Ray popped down to fix the lock on my front door. He had a quick look over me and a sort of look that said 'what are we going to do with the old boy?'
Can't blame him for lack of activity, not much you can do in an English winter. But then, to top it all, the boys did not even come over at CHristmas. Would you believe it?? I would have thought a quick visit, a turkey sandwich and a mince pie. Maybe a cracker.
Mind you writing this should stir them into action, I expect they will be down New Years Eve. And then I can look forward to their New Year Resolutuons!!
Saturday 9 July 2011
Progress so far
Hmm......no comment!
I'll be like this 'til 2020 at this rate!

You might like to look at the Brazilian beauty in the last post, though. Shame she's not topless, or automatic!
I'll be like this 'til 2020 at this rate!

You might like to look at the Brazilian beauty in the last post, though. Shame she's not topless, or automatic!
Subscribe to:
Posts (Atom)